creating a JSP page using Apache
Today we got to create our first login page with a rudimentary jsp function!! So excting aaaa!
As someone who mainly studied front-end dev, it was truly refreshing to apply java with HTML to create a responsive web page!
Hold on.. but what exactly is JSP?
JSP stands for Jakarta Server Pages( (JSP; formerly JavaServer Pages)).
It is a server-side technology which is used for creating web applications. It is used to create dynamic web content. JSP consists of both HTML tags and JSP tags. In this, JSP tags are used to insert JAVA code into HTML pages.
It is an advanced version of Servlet Technology i.e. a web-based technology that helps us to create dynamic and platform-independent web pages.
So to create a functioning JSP page, first we need to download Apache Tomcat. Which is super easy, just google the name and download a version (We used version 9 in ours).
- creating a new dynamic web project for the JSP page
eclipse > create a new project > select dynaimc web project > add name > new runtime > select tomcat ver> next > select file path> finish - setting up runtime
target runtime > tomcat ver > finish - Creating new html and JSP files for the server
project> src> webapp:right click new>html> name as index. html > start working! = same goes for creating JSP! - starting the server
select project: right click > run on server > select tomcat version > finish> allow server to run!
When writing in a JSP file we can use both html and java!
Just make sure to add java code <% in between these cool brackets! %>.
We can also use <%= to add a single java variable! >
Creating a basic login page!
1.) Inside the webapp folder, create a login.html file :3
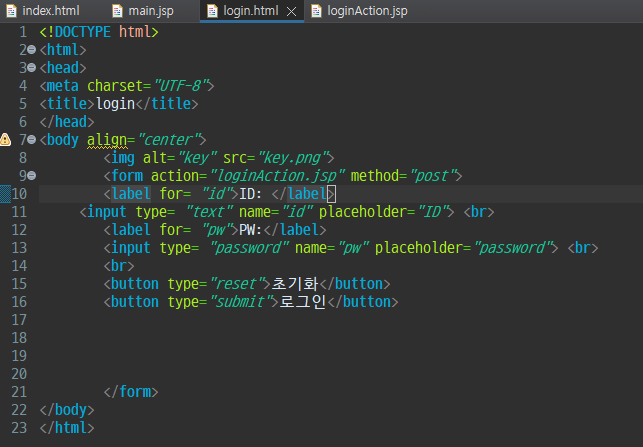
So it's your typical login format inside a form tag and we set the method to post so other people can't see the info the user typed in! Also set the action to "loginAction.jsp", this will be the jsp that will actually process the login!
2.) Create the loginAction.jsp that will be processing the login!

Useful methods used for the jsp page!
We will be using the method .getParameter( ), to fetch the value of the id and pw from the form tag in the html! They will know which is which by grabbing the 'names' of the input tags we used earlier!
We also used .equals( ), which is used to compare the value of string as we can't use the ' ==' that we use for primitive types.
There is also response.sendRedirect("jsp address/html") which is very useful to redirect the page so the user is either moved to the successful login page or back to the start if the details were incorrect.
2D arrays: inner arrays with different sizes
When creating 2D arrays wih inner arrays of varing sizes we set the size of the outer array first!
We can set the size of the inner array once we need them to be activated as below.
int[][] arr03 = new int[3][ ]
arr03[0]= new int[10];
arr03[1]= new int[5];
arr03[2]= new int[15];
for (int i = 0; i < arr03.length; i++) {
for (int j = 0; j < arr03[i].length; j++) {
System.out.printf("%d ", arr03[i][j]);
}
System.out.printf("\n");}
Object Oriented Programming: introduction to its fundamentals
So, we just started learning about OOPs today, and what I've grasped from the lesson so far is that it works similarly to functions in javascript (crude example probably once I look back on it). On a basis that you can create different anonymous functions that you can replace arguments in to bring out different outcomes. Essentially a little factory where you put in the ingredients and it gives you the finished product.
So there are 3 major parts in Java's OOP. (I may be wrong on this too, I will get back to this)
- the variables
- the contructor (the factory itself, this can be cloned to make smaller factories that output what you need)
- the method (think of this as little components/ building blocks that can be installed in the factory to bring partial results)
These three are combined to produce us results that we are seeking!
Example 1: An overview
First! We create a java file specifically for our three components above: field, contructor and method.
We created a class called Human and made this!
public class Human {
// 필드 /속성 /정보
FIELDS ARE HERE!!
String name;
int age;
String ssn;
// 생성자 / 인스턴스 만들때 사용하기 위해서
THE CONSTRUCTOR IS HERE!!
public Human(String name, int age) {
// method shape, 단 클래스명과 일치하는 이름 가짐 = 대문자로 시작
System.out.println("인스턴스를 만듭니다");
// add((int) 3.14, (int) 6.66);
}
// 메서드 / 기능/ 행동을 하라고 하기 위해
public Human(String string, int i, String string2) {
this.name= string;
this.age=i;
this.ssn = string2;
}
AND THE METHOD!!!
public String eat(int num) {
System.out.println( num + "번 먹습니다");
return "배부름";
// 여기엔 출력문이 있을수 없다, return 에서 끝!
}
}
Now we can summon those said components into another Java class file!! We called this one OOP01.
public class OOP01 {
public static void main(String[] args) {
// TODO Auto-generated method stub
Human human = new Human("R2D2", 20 );
Human human2 = new Human("yoda", 20, "990825-1111111");
human.eat(2);
System.out.println(human2.name);
System.out.println(human2.age);
System.out.println(human2.ssn);
}
}
human.eat(2);
Remember we talked how methods work as building blocks for the factorys we make? this is a great example.
In Human, the eat method does this:
public String eat(int num) {
System.out.println( num + "번 먹습니다");
return "배부름";
}
So when we plug this method into the human, put our number (which is 2) because it requests an int) this prints out!
인스턴스를 만듭니다
2번 먹습니다
the first line prints as the human itself is executed then the eat() gets executed straight after!!
NOW THE ABSOLUTE BADASS THING ABOUT OOP IS THAT WE CAN CREATE NEW CLASSES THAT CAN BE DIFFERENCIATED BY THE TYPES THAT GO INTO IT AS WELL!!! (SO COOL!)
So there is human, that only takes a string name and int age as its variable. And there is human 2 that takes string name, int age and string ssn despite being cut from the same cloth, it can do different things :3
We can do this by doing this behind the scenes!!
public Human(String name, int age) {
System.out.println("인스턴스를 만듭니다");
}
public Human(String string, int i, String string2) {
this.name= string;
this.age=i;
this.ssn = string2;
}
Now the cool thing here is, to get the values of human2 which utilises the second Human class (since it has 3 params), instead of running the program inside itself, it actually reaches up to the first Human class above (lend a hand please?) and have it run the String name and int age and assigns it to itself! This is done by using the word this which we also briefly learned in Javascript!
So the second Human only has to run the last part which is this.ssn = string2!
To see if human2 has really gotten the help from the two Humans, we can print the results out:
System.out.println(human2.name); //yoda
System.out.println(human2.age); //20
System.out.println(human2.ssn); // 990825-1111111
Aaand it is correct!!
'JAVA' 카테고리의 다른 글
| Interface and Exceptions (0) | 2024.07.02 |
|---|---|
| Recap of Access Modifiers and deep dive into 4 pillars of OOP (0) | 2024.07.01 |
| OOP continued: Static, access modifiers, Singleton pattern (0) | 2024.06.29 |
| Object Oriented Programming: Fields, Constructors and methods (0) | 2024.06.27 |
| JAVA: Deep and Shallow Copying, String Class Methods (0) | 2024.06.26 |